- HubPages»
- Technology»
- Computers & Software»
- Computer How-Tos & Tutorials
How to Make A Windows and Linux Multiboot USB Flash Drive

Part 2
- Windows and Linux Multiboot Flash Drive Part 2 (How I did it)
Once you have read this, If you would like to know more about how I made mine, please go to part 2 of this article
Boot Windows and Linux live from flash drives - Part 1
"Getting my Linux CD isos to work (Knoppix etc) was fairly straightforward...but I wanted a live Windows system like the "Ultimate Boot CD for Windows" on there as well."
Working in the IT industry, I am sometimes asked to recover some fairly major breakdowns and perform specialised tests, and I thought it would be useful to put some of my "live CD" tools onto a bootable flash drive. I thought it would be a simple job, and looked on the internet to find out the best way of doing it.
Getting my Linux CD iso's to work (Knoppix etc) was fairly straightforward, using "Grub for DOS" as a bootloader, but I wanted a live Windows system like the "Ultimate Boot CD for Windows" on there as well. Getting this to work with the Linux iso's was far from easy.
This guide isn't meant to be a step by step guide - there are some excellent forums and sites which will help with that, and will also help you in using the tools. This is just meant to help with some of the snags you may come across - things I wish I'd known when I started!
The tools mentioned such as UBUSB.exe ImgBurn and Knoppix V5.1.1 are legally available for free download. If you are not familier with Bart PE and Windows Live systems you will need to do some research. The tools for buildng this system are also legally available for free download, but you will be governed by your Windows licence.
The usual disclaimer - this is what I have found out from other excellent sites, together with my own research on my own system. The techniques here MAY contain errors and / or spelling mistakes! One tiny mistake could cause your system to stop working. Make sure you UNDERSTAND what you are doing, or practise on a system you can afford to put out of service!!!
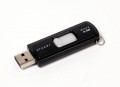
To build this system, I used a SanDisk Cruzer 8GB flash drive (I removed the U3 partition), Windows XP, and also a Knoppix V5.1.1 live CD. I haven't tried it using Vista.
A few tips first, in case you've already tried this and you're a bit stuck. This might give you a bit of help. Then the "how I did it" - as I said, not a full guide to using the tools, you'll find other help elsewhere for that. This is more a guide if you're fairly familiar with the basics but looking for ideas.
A few tips
The grub multibootloader
There is a Grub for Linux and a Grub for Dos. There are some slight differences in the commands and the "ls" command in Grub4Dos will let you see what is on your drive as you are working with it. This feature doesn't seem to be in Grub for Linux, and that is why I prefer the Windows version. It is also installed automatically using the UBUSB method (see below) which saves a lot of time and simplifies things.
UBUSB.exe is a wonderful Windows tool for making the flash drive bootable with the live Ultimate Boot windows system (ie. Bart etc). It also installs Grub4Dos automatically. I found that the easiest way to make the multiboot flash drive was to just run this tool, and let it install the Windows Live system. You then immediately have a flash drive with a single partition with Grub4Dos installed and a live windows operating system.
Linux GParted
The Linux "gparted" command / tool is great for resizing this partition and making new partitions, and has a nice graphical user interface. The command "dd" (Data Dump) lets you copy existing iso's (images) from your hard drive to the new partitions as images. DON'T PANIC if you're not very familiar with Linux, and you don't have it on your computer. All you need to do is download a live CD ISO which has the tools on it, and make a live CD from it, using a windows tool such as ImgBurn. I used a Knoppix 5.1.1 live CD for all the Linux operations mentioned in this guide In fact, I used a CD-RW because I hate waste! Knoppix 5.1.1 loads with a nice GUI (Graphical User Interface) and is "ready to use" as soon as it has loaded.
When Knoppix has loaded, click on the little command line icon at the bottom of the screen and type sudo su <enter> to get full privileges, then type gparted to run the partition program.
When organising the partitions, I tried to copy the live Windows system (which UBUSB had made) into a logical partition, and then into a second Primary partition just to see what would happen. Apparently windows can't easily be made to boot from a logical partition, but should be OK booting from a different Primary partition, but I couldn't make this work reliably. After spending hours and hours on it over the last month, I wasn't prepared to spend any more time on it. It works perfectly well left on the partition where UBUSB puts it, even after resizing that partition with gparted, so I (eventually!) left it alone. (As you can probably tell, this all involved much reformatting, much rebooting and much time to arrive at this conclusion!)
The Knoppix command to copy an iso to one of the new partitions is dd, and it takes the form dd if=/pathtoinputfile/ of=pathtooutputfile/ For example,
dd if=/media/hda1/"Documents and Settings"/Mark/Desktop/"My ISOs"/knoppix.iso of=/dev/sda6
will copy an image file called knoppix.iso from my hard drive to one of the new partitions I've made on the flash drive. (Note the speech marks around the parts of the directory structure which have spaces in them! See below).
Windows XP won't normally see partitions on flash drives. There are ways to overcome this, but in my opinion the method used here with Knoppix is by far the easiest. It also keeps the partitions hidden from windows to a certain extent, which for the purpose of this flash drive (where there may be viruses and trojans on customers computers) is no bad thing.
It may be that re- sizing and partitioning is not necessary, but I haven't tried not doing it. I prefer each system to be on it's own partition for the reasons outlined above.
It is a simple matter to reformat each partition and "burn" a new iso to change to a newer or even diferent Linux operating system. Just change the commands in the grub Menu.lst accordingly. However, I suspect that changing the version of the Windows Live system might mean starting from "scratch" with the UBUSB.exe tool and reformatting the whole flash drive.
When using this working bootable flash drive in a standard Windows XP working system, you will be able to see the files and folders in the first (Windows) partition of the drive. You can use the spare room for storing things as normal (I like to keep useful tools as stand-alone .exe files here). Be careful doing this though, I would suggest you put ALL your tools into a single top level folder such as "My Tools" so you don't loose them amongst the windows live files and folders. I would have liked to have hidden the windows live files and folders, but unfortunately doing so seems to stop windows live from loading properly.